Buster Bar Ice Cream Dessert-Easy No-Bake Treat
Buster Bar Ice Cream Dessert is more than just a sweet treat; it’s a nostalgic journey back to childhood summers and carefree days. If the mention of its iconic chocolate shell, creamy ice cream center, and crunchy peanut coating brings a smile to your face, then you’re in for a real delight! We’ve all stood in front of the freezer aisle, captivated by that familiar shape and the promise of pure bliss. What is it about the Buster Bar that makes it so universally loved? It’s that perfect symphony of textures and flavors – the cool, smooth ice cream perfectly complemented by the satisfying snap of the chocolate and the irresistible salty crunch of roasted peanuts. This homemade version of the beloved Buster Bar Ice Cream Dessert captures all those cherished elements, allowing you to recreate that magic in your own kitchen. Get ready to impress your family and friends, or simply treat yourself to a truly special indulgence!
Buster Bar Ice Cream Dessert
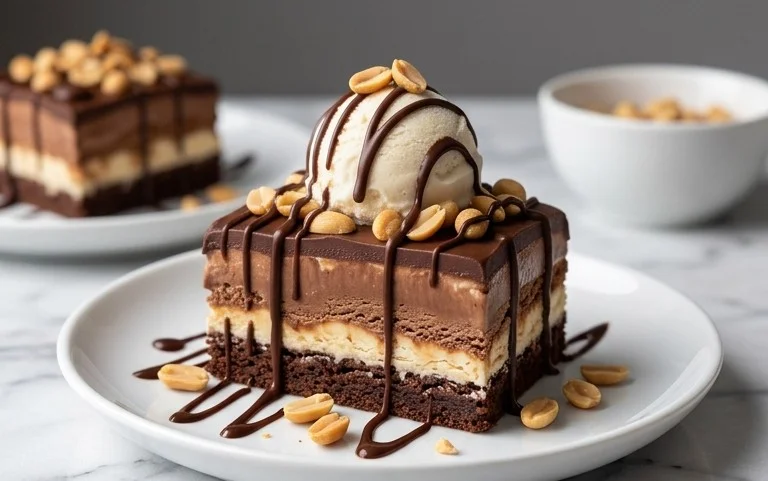
Get ready to recreate a beloved classic in your own kitchen! This Buster Bar Ice Cream Dessert is a layered marvel that brings together the irresistible crunch of Oreos, creamy vanilla ice cream, salty Spanish peanuts, and a luscious chocolate coating. It’s the perfect no-bake treat for any occasion, from a casual weeknight indulgence to a show-stopping dessert for your next gathering. Forget the freezer aisle; this homemade version is so much more satisfying and surprisingly simple to whip up. The magic lies in its contrasting textures and the perfect balance of sweet and salty.
Ingredients:
Preparing the Layers: The Foundation of Flavor
Let’s get started on building this incredible dessert. The first step involves creating the delicious Oreo crust that forms the base of our Buster Bar.
1. Crush Those Cookies: Take your entire package of Oreo cookies (yes, the whole 14.3 oz!) and get them into a fine crum extractb. You can do this by placing them in a food processor and pulsing until they resemble coarse sand. If you don’t have a food processor, don’t worry! Simply place the Oreos in a large zip-top bag, seal it tightly, and then go to town with a rolling pin. The goal is to break them down into small, consistent pieces.
2. Bind the Crust: In a medium bowl, combine the crushed Oreo cookies with 1/2 cup of melted butter. Stir thoroughly until all the cookie crum extractbs are moistened by the butter. This is what will hold your crust together.
3. Press the Crust: Take a 9×13 inch baking dish. If you want to make life easier for removing the finished dessert, you can line it with parchment paper, leaving some overhang on the sides. This will act as handles. Press the butter-and-Oreo mixture evenly into the bottom of the prepared baking dish. Use the back of a spoon or the bottom of a measuring cup to get a nice, compact, and even layer. This forms your sturdy base.
Building the Ice Cream Core
Now comes the creamy, dreamy part!
4. Soften and Spread the Ice Cream: Make sure your half-gallon of vanilla ice cream is softened, but not completely melted. You want it scoopable and spreadable. If it’s too hard, it will be difficult to work with. If it’s too soft, it will become a soupy mess. Gently spread the softened vanilla ice cream in an even layer over the Oreo crust. Try to get it as smooth and uniform as possible for the best texture in every bite. You can use an offset spatula for this, or even the back of a spoon.
Adding the Peanutty Crunch
The Spanish peanuts add that signature salty crunch that makes this dessert truly special.
5. Distribute the Peanuts: Generously sprinkle the entire pound of Spanish peanuts evenly over the softened vanilla ice cream layer. You want a good, substantial layer of peanuts to ensure you get that satisfying crunch in every mouthful. Don’t be shy with them!
Crafting the Luscious Chocolate Topping
This is where the magic truly happens, transforming our creation into a Buster Bar masterpiece.
Making the Chocolate Ganache
This simple ganache is the perfect complement to the ice cream and peanuts.
1. Melt the Chocolate and Butter: In a medium saucepan over low heat, combine the 12 ounces of semi-sweet chocolate chips and 1/2 cup of butter. Stir constantly until both are completely melted and smooth. It’s important to use low heat to prevent the chocolate from scorching.
2. Incorporate the Evaporated Milk and Sugar: Once the chocolate and butter are melted and smooth, gradually whisk in the 12 ounces of evaporated milk and the 2 cups of powdered confectioner’s sugar. Continue to whisk until the mixture is smooth, creamy, and free of lumps. This will create a rich, pourable chocolate sauce.
3. Pour and Freeze: Immediately pour the warm chocolate mixture evenly over the peanut layer, ensuring the entire surface is covered. Work relatively quickly, as the ice cream will start to melt slightly from the warmth of the topping.
4. Chill to Perfection: Place the entire baking dish into the freezer. Allow it to freeze for at least 4-6 hours, or until completely firm. The longer it freezes, the easier it will be to cut and serve.
Serving Your Homemade Buster Bar Masterpiece
Once your Buster Bar Ice Cream Dessert is fully frozen, it’s time to enjoy your creation! You can cut it into squares or bars using a sharp knife. If it’s very hard, let it sit at room temperature for about 5-10 minutes before cutting to make it easier.
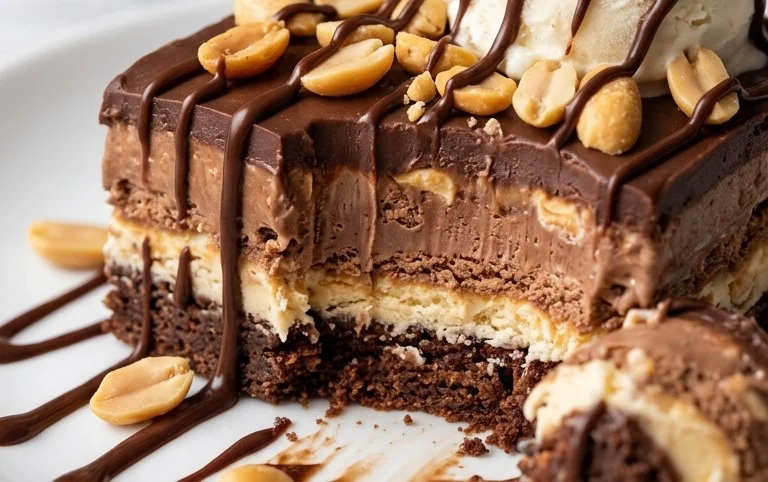
This dessert is best enjoyed right out of the freezer. The combination of the crunchy Oreo base, smooth vanilla ice cream, salty peanuts, and rich chocolate coating is simply divine. It’s a nostalgic treat that’s always a crowd-pleaser, and making it yourself adds an extra layer of satisfaction. Enjoy every delicious bite!
Conclusion:
There you have it! This Buster Bar Ice Cream Dessert is an absolute showstopper, and I’m so excited for you to try it. It’s a fantastic blend of creamy, crunchy, and chocolatey goodness that will transport you back to childhood nostalgia with every bite. The beauty of this recipe lies in its surprising simplicity, delivering a gourmet-quality dessert that’s surprisingly achievable in your own kitchen. Whether you’re looking for a delightful treat after a family dinner or a crowd-pleasing dessert for your next gathering, this recipe is guaranteed to impress.
I love serving this Buster Bar Ice Cream Dessert straight from the freezer, cut into generous squares. It also pairs wonderfully with a drizzle of hot fudge sauce or a dollop of whipped cream for an extra touch of decadence. For those who like to get creative, feel free to experiment with different types of chocolate chips or even add chopped nuts like peanuts or almonds to the chocolate coating for an extra layer of texture. Don’t be afraid to make this your own!
So, what are you waiting for? Gather your ingredients, get your hands a little messy, and dive into the deliciousness of this incredible Buster Bar Ice Cream Dessert. I promise you won’t regret it!
Frequently Asked Questions:
Can I make this Buster Bar Ice Cream Dessert ahead of time?
Absolutely! This dessert is perfect for making ahead. In fact, it’s best when it has had plenty of time to freeze solid. You can prepare it a day or two in advance and keep it wrapped tightly in the freezer.
What if I don’t have a specific type of chocolate chip?
No problem at all! You can use any semi-sweet chocolate chips you have on hand. Milk chocolate or even dark chocolate will work beautifully. The key is to melt them smoothly so they create a nice, even coating.
How should I store leftovers?
Leftovers can be stored in an airtight container in the freezer. Make sure to wrap them well to prevent freezer burn. They should remain delicious for up to a week.
Buster Bar Ice Cream Dessert
A no-bake ice cream dessert featuring a cookie crust, peanut butter ice cream filling, and a chocolate shell.
Ingredients
-
14.3 oz pkg. of Oreo cookies, crushed
-
1/2 C butter, melted
-
1/2 gal. vanilla ice cream, softened
-
1 lb. Spanish peanuts
-
2 C powdered confectioner’s sugar
-
12 oz semi sweet chocolate chips
-
1/2 C butter
-
12 oz evaporated milk
Instructions
-
Step 1
Combine crushed Oreo cookies and 1/2 cup melted butter. Press into the bottom of a 9×13 inch pan. -
Step 2
Spread softened vanilla ice cream evenly over the cookie crust. -
Step 3
In a separate bowl, mix softened vanilla ice cream with softened butter and powdered confectioner’s sugar until well combined. -
Step 4
Fold in Spanish peanuts into the ice cream mixture. -
Step 5
Spread the peanut ice cream mixture over the first layer of ice cream. -
Step 6
Melt semi-sweet chocolate chips with 1/2 cup butter and evaporated milk in a double boiler or microwave, stirring until smooth. -
Step 7
Pour the melted chocolate mixture over the top of the dessert, spreading evenly. -
Step 8
Freeze for at least 4 hours, or until firm.
Important Information
Nutrition Facts (Per Serving)
It is important to consider this information as approximate and not to use it as definitive health advice.
Allergy Information
Please check ingredients for potential allergens and consult a health professional if in doubt.